
Introduction
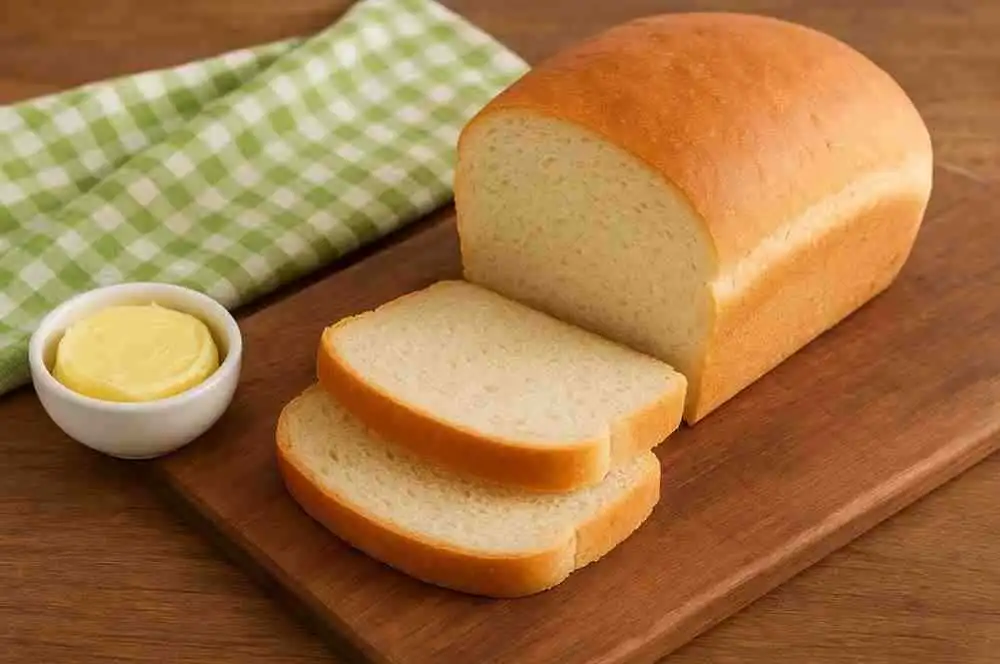
One of the most rewarding habits I’ve adopted in the kitchen is baking my own Vintage Bread Recipe. Not only does it save money, but it also results in bread that tastes far fresher and more satisfying than store-bought loaves.
The beauty of this Easy Vintage Bread Recipe lies in its simplicity. The ingredients are basic, affordable, and easy to find, making it a perfect fit for everyday baking. With just a little practice, you can enjoy the comforting aroma of freshly baked bread filling your home and the pride of making a wholesome loaf from scratch.
Whether you’re a seasoned baker or a beginner, this vintage recipe adapts easily to your routine. Each batch allows for small creative touches—like adding seeds or herbs—so you can customize your bread while keeping it true to its classic roots.
Start your baking journey today with this timeless Vintage Bread Recipe and experience the joy of homemade bread the easy way.
Table of Contents
My love for making Easy Vintage Bread Recipe often takes me back to flipping through my #1 vintage cookbook, Encyclopedia of Cooking by Ruth Berolzheimer. Just like a trusted recipe with time-tested ratios, these old pages feel almost unchanged even today.
I’ve also gained invaluable insights from different editions of Joy of Cooking by Irma Rombauer, where simple, clear instructions bridge the gap between historical methods and modern kitchens. These cookbooks show how vintage bread recipes have endured for generations, proving that great bread is both timeless and approachable.
Timeless Inspirations from Old Cookbooks
My love for making Easy Vintage Bread Recipe often takes me back to flipping through my favorite vintage cookbook, Encyclopedia of Cooking by Ruth Berolzheimer. Just like a trusted recipe with consistent ratios, these old pages remain almost unchanged even today. I’ve also learned so much from various editions of Joy of Cooking by Irma Rombauer, where simple, clear instructions beautifully connect historical techniques with modern kitchens.
Why proofing matters before baking Easy Vintage Bread Recipe
I always proof my yeast when making an Easy Vintage Bread Recipe because it eliminates the risk of wasting good ingredients on dough that won’t rise. Nothing feels worse than mixing everything together only to discover the yeast was stale. This simple step ensures every loaf turns out perfectly, just like the vintage recipes intended.
Getting the liquid just right
When I start preparing dough for an Easy Vintage Bread Recipe, I first add salt, shortening, and the remaining sugar to hot scalded milk, then let it cool until lukewarm. This small detail makes a big difference in how the dough behaves later. Over the years, I’ve learned that carefully controlling the liquid temperature helps the yeast work its magic, turning an ordinary loaf into a truly special vintage bread.
The art of working your dough
Mastering Dough for the Perfect Vintage Bread Recipe
When making a Vintage Bread Recipe, achieving the right texture is key. I always start by adding softened yeast to about 3 cups of flour and beating it thoroughly. Then, I gradually mix in just enough of the remaining flour to create a soft, pliable dough that’s easy to work with.
Once the base dough is ready, I turn it out onto a floured countertop or kneading board and work it until it becomes smooth and elastic. This step develops the gluten, giving the bread its classic structure and soft crumb.
At this stage, I sometimes incorporate fat and salt with the liquid in a separate bowl, which is especially helpful when using a stand mixer for an Easy Vintage Bread Recipe. This method ensures that every loaf has the rich flavor, tender texture, and timeless quality that make a true Vintage Bread Recipe so special.
By carefully following these steps, you can consistently bake a loaf that not only rises beautifully but also captures the authentic charm and taste of vintage-style bread.
Creating the Perfect Resting Stage Easy Vintage Bread Recipe
How to Let Dough Rise Perfectly for a Vintage Bread Recipe
When preparing an Easy Vintage Bread Recipe, I like to place the lump of dough in a greased bowl and gently turn it so every surface is coated, ensuring a smooth side rests on top. This simple step prevents the dough from sticking and creates an even rise.
To protect the dough, I cover the bowl with a cloth and let it rise until it has doubled in bulk. A warm spot works best, encouraging the yeast to activate fully. For added flexibility, I sometimes let the dough rise slowly in the refrigerator, which also develops a richer flavor and texture in the finished loaf.
By carefully managing the rising process, every loaf of your Vintage Bread Recipe turns out beautifully soft, airy, and perfectly shaped—just like the traditional vintage breads that inspired it.
Mastering Everyday Variations Easy Vintage Bread Recipe
Perfecting Oven Temperature for a Vintage Bread Recipe
When I first learned to bake an Easy Vintage Bread Recipe, I quickly realized how much control oven temperature has over the final loaf. A hot oven set at 400°F for 10 minutes creates a beautifully crisp crust, while lowering the temperature to 350°F and baking for 30–35 minutes produces a softer interior and longer-lasting bread.
Sometimes, I experiment by extending the baking time to 40 minutes or increasing the temperature to 425°F for 35 minutes, especially when aiming for crusty French-style baguettes or rustic Italian flatbreads.
By mastering oven temperature, you can customize your Vintage Bread Recipe to achieve the perfect balance of crust and crumb, giving each loaf the texture and flavor you desire.
White Easy Vintage Bread Recipe
Shaping and Baking with Care
When making an Easy Vintage Bread Recipe, I start Step 1 by breaking 2 eggs into a 2-cup measure and beating them with milk to create exactly 2 cups of smooth mixture. This method replaces using all milk and enriches the flavor beautifully, adding a subtle creaminess to the dough.
By Step 8, it’s time to divide the dough for each loaf into three equal parts. I carefully roll each portion into a strand, then gently braid the trio of strands, pinching the ends to seal. This careful shaping not only gives the bread a classic, elegant appearance but also ensures even baking and a tender, soft crumb.
Following these shaping techniques helps every loaf of your Vintage Bread Recipe turn out both visually stunning and irresistibly delicious, just like traditional vintage breads.
Flavorful Twist with Caraway and Tomato Easy Vintage Bread Recipe
Adding Flavor and Shaping for a Vintage Bread Recipe
In Step 1 of my Easy Vintage Bread Recipe, I often substitute about 2 cups of warm tomato juice for milk, which adds a tangy depth and a subtle richness to the bread. I also like to mix in approximately 1 tablespoon of caraway seeds, as their nutty, slightly spicy flavor complements the tomato beautifully.
By Steps 7 through 9, I divide the dough into four equal parts and carefully roll each into a long, thin loaf, nearly 14 inches in length. The loaves are then placed on lightly greased baking sheets to rise, ensuring they maintain their shape and develop a perfect crust.
This method of adding unique flavors and carefully shaping the dough ensures every loaf of your Vintage Bread Recipe is full of character, visually appealing, and deliciously aromatic—bringing traditional baking to life in your kitchen.
A Savory Twist with Onion Easy Vintage Bread Recipe
Flavorful Twists for an Easy Vintage Bread Recipe
In Step 1 of my Easy Vintage Bread Recipe, I like to use one 10½ oz. can of onion soup, combined with just enough warm water to make about 2 cups of flavorful liquid in place of all milk. This not only deepens the taste but also allows me to skip the sugar and use only 1 teaspoon of salt for perfect seasoning.
To heighten the aroma and flavor, I add 1 tablespoon of instant minced onion, which blends seamlessly into the dough and gives every bite a gentle, savory burst. This simple adjustment transforms a standard loaf into a uniquely delicious Vintage Bread Recipe, offering a rich, aromatic flavor that elevates any meal.
A Lighter Way to Bake Easy Vintage Bread Recipe
Milk Alternatives for an Easy Vintage Bread Recipe
In Step 1 of my Easy Vintage Bread Recipe, I often use all water or sometimes combine ½ cup of powdered skim milk stirred into 1⅞ cups of liquid. This is just about 2 tablespoons less than 2 cups, but it balances perfectly and works as a substitute for regular milk.
Using this method ensures the dough maintains the right consistency while keeping the flavor light and versatile. Whether you’re looking for a classic loaf or a variation, this simple adjustment makes your Vintage Bread Recipe adaptable without compromising texture or taste.
A Fun Loaf with Tiny Bites Easy Vintage Bread Recipe
Creating a Poppy Seed Variation of a Vintage Bread Recipe
In Steps 7 through 10 of my Vintage Bread Recipe, I like to pinch small pieces of dough that has been punched down, shaping them into tiny balls about 1 inch in diameter. Once they’re ready, I melt around 4 tablespoons of butter and measure about ¼ cup of poppy seeds. Each dough ball is dipped first into the golden butter and then into the nutty poppy seeds, ensuring every piece is coated with rich flavor.
The fun part comes with stacking the coated balls into a lightly greased 10-inch tube pan, seed side up. As the dough rises and bakes, the little clusters fuse together, giving the loaf its playful, pull-apart texture and a beautiful signature look.
This creative twist adds variety and charm to any Vintage Bread Recipe, turning a simple loaf into something both delicious and eye-catching.
Rolling and Layering the Sweetness Easy Vintage Bread Recipe
Cinnamon Swirl Magic in a Vintage Bread Recipe
In Steps 8 and 9 of my Vintage Bread Recipe, making a Cinnamon Swirl Loaf is always the most satisfying part. I roll out the soft dough into a rectangle about 6 by 16 inches, enjoying the way the texture feels just right as it stretches evenly beneath the rolling pin.
Then comes the magic: I mix 4 tablespoons of sugar with 4 tablespoons of cinnamon, and the warm, spicy aroma instantly fills the kitchen. Sprinkling half of the mixture evenly over the top of each rectangle feels like painting a canvas of flavor, setting the stage for a swirl that bakes into every slice.
This simple yet flavorful step transforms a classic Vintage Bread Recipe into a fragrant, bakery-style loaf that’s as beautiful to look at as it is delicious to eat.
Flavorful Twist with Citrus and Nuts Easy Vintage Bread Recipe
A Fruity Twist on a Vintage Bread Recipe: Orange-Raisin-Nut Bread
When I first experimented with my Vintage Bread Recipe, I tried substituting 2 cups of warm orange juice for milk, and the result completely transformed the flavor profile. The bread carried a fresh, zesty aroma, enhanced by 1 tablespoon of grated orange peel that made each slice bright and refreshing.
To balance the citrus tang, I added 1 cup of seedless raisins, which gave sweet little bursts of flavor in every bite. The combination of orange and raisins created a loaf that was not only fragrant but also rich in taste and texture. Adding a handful of nuts for crunch turned this variation into a wholesome, bakery-style bread that feels both nostalgic and new.
This simple variation shows how versatile a Vintage Bread Recipe can be—whether you prefer classic loaves or enjoy experimenting with fresh, fruity twists.
Infusing Flavor with Fresh Herbs Easy Vintage Bread Recipe
Herb Variations for a Vintage Bread Recipe
When I first started experimenting with herb breads, I discovered how exciting it is to create two distinct flavors in the same batch of dough. In Step 4 of my Vintage Bread Recipe, I usually divide the dough into two parts so I can knead each portion separately, allowing different herbs to blend deeply into the texture.
The joy comes from watching how kneading not only strengthens the dough but also helps release the natural oils of the herbs, infusing each loaf with its own unique character. Sometimes I choose gentle, earthy herbs for a subtle flavor, while other times I reach for bolder varieties to create a more robust, aromatic loaf.
This simple approach adds versatility and creativity to your Vintage Bread Recipe, turning every bake into a fresh opportunity to explore new tastes while keeping the classic charm of vintage-style bread.
Dark Bread Variations Easy Vintage Bread Recipe
Balancing Flours in a Vintage Bread Recipe
When I first learned how to bake darker breads at home, the most valuable lesson was understanding how to substitute flours in the right order. In my Vintage Bread Recipe, I make sure that the first, second, and even the sixth or last cups of flour are all-purpose, white, or whole wheat. These provide the strength and structure the dough needs.
The middle cups—the third, fourth, and fifth—are where I experiment by adding other grains like rye, cornmeal, or oat flour. This balance ensures the dough holds together while still delivering the deep, rustic flavor that makes darker breads so satisfying.
By carefully managing the flour substitutions, you can enjoy a hearty, flavorful loaf that stays true to the classic qualities of a Vintage Bread Recipe while adding your own creative twist.
Balanced Blend of Flours Easy Vintage Bread Recipe
When I first experimented with rye bread, I discovered that balance is everything. Using 2 cups of rye flour gives the bread its earthy depth, while 4 cups of all-purpose flour provide the strength and structure needed for a lighter crumb. This combination creates a loaf that is hearty yet not overwhelming, something I personally enjoy when serving it with soups or simple spreads Easy Vintage Bread Recipe.
Flavorful Infusion Easy Vintage Bread Recipe
When I first tried baking Swedish Orange Rye, I was amazed at how a few small touches transformed the taste completely. The base starts with 2 cups rye flour and 4 cups all-purpose, which create a balanced dough—firm enough to hold structure yet soft when baked. In Step 1, you add bright notes by mixing in 2 tablespoons grated orange peel, which gives the bread a refreshing aroma that fills the kitchen long before it leaves the oven Easy Vintage Bread Recipe.
Dark Rye Easy Vintage Bread Recipe
When I bake dark rye Easy Vintage Bread Recipe, I like starting with a balance of 3 cups rye and 3 cups all-purpose flour because it gives the loaf both strength and flavor. The flour combination makes the dough easy to handle but still keeps that traditional dense bite rye is loved for. In Step 1, I always omit sugar, choosing instead to work with a natural sweetener that also enhances the color and aroma. This switch makes the bread feel more authentic, closer to the rustic loaves I grew up tasting at local bakeries.
Balancing Texture and Flavor Easy Vintage Bread Recipe
When I first experimented with 1 cup rye flour mixed into 5 cups all-purpose, I noticed how the dough behaved differently compared to darker loaves. The balance gave the bread a lighter body, almost airy, with greater volume that stood out beautifully on the table. Unlike darker Easy Vintage Bread Recipe, which feel heavier and more rustic, this style feels softer yet still keeps the character of rye.
A Natural Sweetness Alternative Easy Vintage Bread Recipe
When baking with all whole wheat flour, I’ve noticed it behaves differently than white flour. In Step 1, I usually omit sugar and try natural options. A simple ½ cup of honey brings warmth and moisture, while molasses gives the bread a deeper, earthy tone. Sometimes, I even use maple syrup for a lighter sweetness that blends beautifully Easy Vintage Bread Recipe.
50% Whole Wheat, Graham, or Cracked Wheat Easy Vintage Bread Recipe
When I first started baking Easy Vintage Bread Recipe hearty loaves, I would often use a mix of flours rather than sticking to just one type. For balance, I found that blending 3 cups of all-purpose with the same measure of coarser grains gave the bread a lighter structure while still holding that earthy flavor. It reminded me of the breads I grew up with—nutty, wholesome, and filling without being too heavy.
Fruit-Nut Graham Easy Vintage Bread Recipe
When I first experimented with 50% Graham Bread, I realized how simple additions can completely transform the taste. In Step 7, I learned to knead in exactly 1 cup of chopped mixed glacéed fruit along with some pitted dates and nuts. This not only gave the bread a beautiful texture but also added a natural sweetness that made every bite more satisfying. Watching the loaves baked Easy Vintage Bread Recipe to golden perfection reminded me of the times I spent in my grandmother’s kitchen, where patience and small details always paid off.
Dark Mixed Grain Easy Vintage Bread Recipe
When I first learned to use different blends of flour, I discovered how much depth of flavor could be achieved in a single loaf. A touch of ½ cup wheat germ brings nuttiness, while 1½ cups buckwheat adds a hearty earthiness. Sometimes, I like to balance it with 1 cup rye and about 4 cups whole wheat to create a base that feels rustic yet nourishing. I remember experimenting late one evening and realizing that by simply choosing the right proportions, I could transform an ordinary bake Easy Vintage Bread Recipe into something memorable.
Building the Base with Grains Easy Vintage Bread Recipe
When I first tried baking Pumpernickel, I learned that its earthy taste comes from the way you use different types of flour together. In Step 1, I would add a mix that started with 1 cup of whole bran cereal, followed by 2 cups rye and 3 cups wheat. This blend gave the dough a rich, hearty texture that felt wholesome and satisfying with every bite Easy Vintage Bread Recipe.


Leave a Reply