
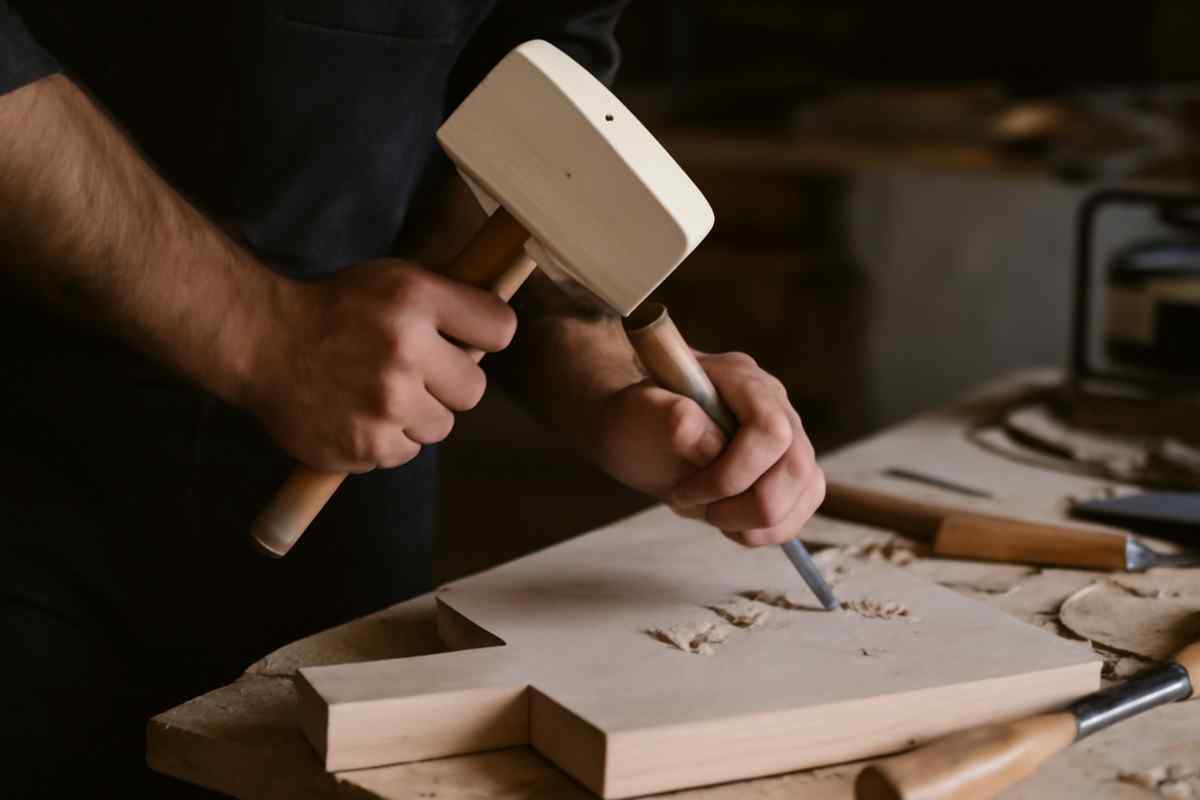
Embarking on Your Wood Carving Journey
Start Wood Carving can feel daunting at first, especially if you’re a beginner surrounded by intricate projects online or seeing beautiful works of art crafted over centuries. From my experience, the key to successfully starting wood carving is to approach it with patience and the right tools, giving yourself permission to try and develop your own style. Anyone can learn, whether you spend time in front of a computer or phone, often stressed by daily work. Creative hobbies like this are gaining popularity these years, and the importance of stepping away from screens to engage your human imagination cannot be overstated.
To start wood carving, begin with simple blocks of wood, focus on the basics, and follow proper guidance. Approachable techniques and consistent practice will allow you to master essential skills, gradually moving from basic cuts to more intricate patterns. The process is increasingly rewarding, and as you spend more time with tools in hand, your confidence will grow, and your creations will reflect a truly unique craft. Taking these first steps today makes the journey accessible and inspiring for anyone willing to commit and enjoy the creative process.
Essential Tools and Materials for Beginners
When you start wood carving, having the right tools can make all the difference. I personally recommend Schaaf Tools, as they are high-quality and designed for beginners, making the learning process smooth and approachable. Being passionate about supporting carvers, they provide comprehensive learning materials, guides, and tutorials that help you succeed in whittling, relief carving, and other techniques. From project videos to sharpening tips, every step is clearly explained, giving you a way to explore your carving journey without frustration.
Start wood carving by starting small with simple projects, which allows you to gain confidence while exploring different techniques. Following these guides and watching detailed tutorials not only helps beginners succeed, but also teaches how to handle tools safely and effectively. Each project becomes a learning opportunity, and by investing time in the materials and guidance provided, you can steadily develop your skills, enjoy the process, and make progress in a structured and comprehensive way.
Mastering Wood Carving Techniques
To truly start wood carving, it’s important to focus on choosing the right tools and wood, as this sets you up for long-term success. In my experience, learning the essential techniques step by step makes the craft far more enjoyable and approachable. Whether you are working on relief carving or whittling, understanding how each tool interacts with different wood types is critical to develop precision and control while carving.
To start wood carving, start small by practicing basic cuts and gradually move to more complex techniques. By setting clear goals and following structured learning, beginners can gain confidence, reduce mistakes, and enjoy the tactile joy of shaping wood into art. Every step in the journey reinforces your skills, and with consistent effort, mastering essential carving methods becomes a natural and rewarding part of your wood carving experience.
Understanding Noise Control with the Right Approach
When you start wood carving, managing noise from a metal roof can be approached like learning whittling with a knife on wood. Just as carving requires the simplest, versatile tools for beginners, controlling roof sound starts with understanding the small details in projects like insulation placement or underlayment. Shaping the right layers, much like forming figures or intricate designs in wood, ensures that sound doesn’t echo unnecessarily. Even a single stick of misaligned material can amplify noise, so careful attention—akin to shaving or honing a sharp blade—is essential. Experienced teachers emphasize using chisels or gouges safely, just as homeowners must take precautions when adjusting panels to avoid hands, fingers, or material damage.
When you start wood carving, using reliable materials and following tested techniques brings control and reduces unwanted sound. Brands like Schaaf Tools illustrate the value of proper kits, eBooks, video tutorials, and step-by-step guidance to feel confident with your utensils. When installation is done carefully, metal roofs can be much safer, and your living space becomes peaceful, reflecting the same satisfaction beginners get when completing carving projects correctly.
Selecting the Best Wood for Your Carving Projects
When you start wood carving, choosing the right wood is key to a smooth carving experience, especially for beginners. Some types can be difficult to work with, so starting with beginner-friendly options like basswood or butternut makes learning much easier. Basswood blocks are soft, easy to carve, and have a fine, uniform grain that reduces splintering and tearing. It’s perfect for whittling and relief carving, providing a forgiving surface for precise cuts. Butternut, a softwood with a beautiful, decorative pattern, adds natural aesthetic, texture, and character to your pieces while remaining manageable for beginners.
Other options like pine are affordable, widely available, and popular for larger projects, though it can be challenging due to resin and a sticky surface. Using resources like Schaaf Tools’ guide can help you start wood carving by deciding the right type of wood for your first project, allowing you to start on the right foot. Choosing carefully ensures every project is more enjoyable, helping you gain confidence while exploring your carving skills.
Getting Started with Whittling
When I first explored wood carving, I found whittling to be the most approachable and enjoyable way to start wood carving. Using just a small knife and a block of wood, beginners can quickly create simple figures and shapes, gaining hands-on experience without feeling overwhelmed. What I love most about whittling is how relaxing and meditative it feels—it transforms a casual hobby into a moment to unwind and focus on the present.
To really start wood carving, I recommend looking at Schaaf Tools beginner project guides. These guides provide easy-to-follow instructions for carving small items like spoons or animals, making it easy for anyone to pick up this new hobby. Choosing the best whittling knives is also crucial; the right tool can make carving safer and more enjoyable, helping beginners feel confident as they progress and refine their skills.
Exploring Chip Carving
Once you start wood carving, and you’re comfortable with whittling, chip carving offers a fresh challenge that hones your skills in precision and control. This technique involves removing small chips from the wood surface to form decorative patterns and intricate designs. Working on flat surfaces like plaques or boxes requires patience, but it’s surprisingly accessible even for beginners when you use the right tools.
From my experience, the key to success when you start wood carving and try chip carving is a calm mindset and steady hands. Taking time to plan your decorative patterns and practicing the removal of small chips gradually builds confidence and skill. With patience, each careful cut transforms plain flat surfaces into beautiful designs, giving a satisfying sense of achievement as you watch your intricate designs emerge.
Mastering Relief Carving
After gaining confidence with whittling and chip carving, relief carving is the next step for those ready for a more complex yet rewarding challenge. This technique involves carving a design into a flat panel of wood, leaving the background recessed while the design appears raised. From my own experience, the key to mastering this skill is investing time and consistent practice, as the layered depth and intricate details require focus and patience.
Using Schaaf Tools relief carving tutorial series can make learning this technique much easier by breaking down the process into steps and manageable pieces. Following these guided tutorials allows you to gradually develop precision and confidence, transforming a blank flat panel into a detailed artwork that showcases your skill. With dedication, relief carving becomes an immensely satisfying way to elevate your wood carving projects.
Selecting Your First Wood Carving Project
When you start wood carving on your first journey, the key is to pick a project that feels manageable. In my early days, I learned that choosing a simple, small item like a spoon, figure, or pendant makes the process less intimidating and far more enjoyable. These beginner-friendly projects let you create a carved piece without feeling overwhelmed, and they teach you the fundamentals of shaping, cutting, and finishing. Using the step-by-step guide from Schaaf Tools helped me understand how each cut impacts the final outcome, giving me confidence to progress.
One tip I always share with newcomers is to explore ideas from a mailing list or online sources for inspiration. Even small bits of information on techniques or material choices can make a big difference when you start wood carving. Focus on beginner-friendly projects that allow you to experiment freely and enjoy the process of turning a raw block of wood into a carved piece. Over time, these small successes build your skill and encourage you to tackle slightly more complex designs, keeping the journey both educational and fun.
Selecting the Right Wood for Your Project
Once you start wood carving on your first project, choosing the right wood is essential. From my own experience, basswood is the ideal option for beginners because it’s easy to hold and carve, even for a small piece. Avoid harder woods like oak or maple until you gain more experience, as they can make the simple steps of shaping and detailing frustrating and slow. Taking the time to pick the right material ensures that your initial efforts are enjoyable and that you can confidently follow each step in your wood carving journey.
I always recommend choosing beginner-friendly wood when you start wood carving, selecting a piece that complements the project you’ve chosen. A small piece of basswood allows you to practice essential techniques without feeling overwhelmed. As you gain experience, experimenting with harder woods like oak or maple can add texture and challenge, making your carving skills stronger. The choice of wood directly affects your first carving experience, so invest time in selecting a material that supports your learning and ensures a smooth, enjoyable start.
Planning and Sketching Your Design
Before you start wood carving on your first project, taking a moment to sketch your design on the wood can save a lot of mistakes. I’ve found that creating a clear outline of the piece helps you visualize the final product and understand where each cut should go. A well-thought sketch acts as a guide throughout the step, making it easier to create clean shapes and avoid errors. Even a simple drawing can give you confidence when moving from concept to actual carving.
When you start wood carving, think of your sketch as the roadmap for the project. By visualizing the piece before touching your tools, you gain control over every cut and the overall flow of your wood carving. This approach ensures that your first project feels organized and achievable, turning raw wood into a final product that matches your vision. Taking the time to create a thoughtful design truly elevates the satisfaction of completing your carving.
Shaping Your Wood with Rough Cuts
After planning your first project, it’s time to start wood carving by making rough cuts. I always begin with a whittling knife or a larger gouge to remove excess wood and establish the basic shape of the piece. This step is about shaping the wood roughly, so don’t worry about the details yet. Focusing on the form and shape at this stage allows the piece to gradually reveal its potential while keeping the project manageable and simple.
When you start wood carving and perform rough cuts, take your time to understand the grain and movement of the wood. Each cut should help define the basic shape while leaving enough material to refine details later. I’ve learned that carefully removing the right amount of excess wood ensures a smoother transition to finer carving, and makes the step of detailing much easier. By mastering this simple technique early on, your first project gains both structure and confidence for the next steps in wood carving.
Refining Your Carving with Details
Once you start wood carving and the rough shape of your piece is ready, the next step is to refine it by adding details. I recommend using smaller chisels or gouges to make clean and precise cuts, focusing on subtle curves and textures that bring the wood to life. Being patient, slow, and steady during this stage is essential; rushing can ruin the first project or distort the intended carving. Taking your time to carefully cut allows each element of the piece to emerge beautifully while practicing fundamental carving techniques.
From personal experience, when you start wood carving, spending extra time on this step makes a huge difference. By gradually refining the rough shape, you gain better control over the wood, and the piece begins to reflect your vision more clearly. Incorporating thoughtful details not only enhances the final outcome but also strengthens your understanding of carving techniques, preparing you for more complex wood carving projects in the future.
Smoothing and Finishing Your Carving
After you start wood carving and complete the first project, the next step is sanding the piece to remove any rough edges and make the wood smooth. I always take my time during this process because even minor imperfections can affect the final touches. Once the surface feels even, you can apply wood oil or a finish to protect the carving and enhance its natural beauty. This step turns your rough piece into a polished, eye-catching result, giving a satisfying sense of completion.
From my experience, when you start wood carving, investing care in sanding and finishing is what transforms a simple carving into a refined work. The final touches not only make the wood smooth and polished but also highlight the details created in earlier steps. Properly finishing a project protects it for long-term enjoyment and allows you to fully appreciate the skill involved in your first wood carving.
Avoiding Common Mistakes in Wood Carving
When you start wood carving on your first project, it’s important to avoid common mistakes that can make the process difficult or unsafe. Using dull tools is a frequent error—it requires more force and increases the risk of a slip, which can be dangerous. Another mistake is rushing through the carving; this slow, deliberate craft demands time and patience. Ignoring the grain of the wood can cause it to split or tear, so learning to adjust your direction with the natural flow of the material is essential for clean, successful results.
From my experience, when you start wood carving, avoiding these early errors reduces frustration and prevents subpar results in your first project. Paying attention to tool sharpness, taking your time, and following the grain carefully allows you to enjoy the process of carving while learning proper techniques. By mastering these fundamentals, you build confidence and create a wood carving project that’s both safe and satisfying.
Embarking on Your Wood Carving Journey
There’s no better time to start wood carving on your first project than now. Wood carving is a rewarding craft that allows you to create with your hands, turning a simple block of wood into something unique. Using the right tools and following proper techniques, whether whittling, relief carving, or chip carving, sets you up for success. I’ve personally found that following step-by-step instructions from Schaaf Tools helped me transition from a beginner to a more confident carver, giving me the skills to create both small and intricate projects.
The key is to embrace the journey fully, making each step part of your learning experience. Support from experienced carvers, combined with learning resources, makes it easier to practice techniques at your own pace. Even as a beginner, consistent effort and exploration of different techniques—from chip carving to relief carving—allow you to gain confidence and enjoy the process of creating with your hands. Each completed project reinforces skills and encourages you to start wood carving new projects, building both experience and passion for the craft of wood carving.


Leave a Reply