
A Practical Path for DIY Tool Sharpening for Every Hand
When I first started learning how to care for my tools, I didn’t realize how much maintaining them would change the way I worked. Over time, I began to believe that a tool in good condition is not just about function—it’s about pride in your craft. Many DIY enthusiasts, skilled craftsmen, curious hobbyists, and even practical homeowners share this same drive. Each time I pick up a tool for DIY Tool Sharpening, I feel the love for small details that truly matter. It’s a wonderful feeling to take control, stick to a routine, and see how a simple edge can turn into something top-notch.
From rolling up my sleeves in a small garage to working with my own hands outdoors, I’ve seen how the world of DIY Tool Sharpening opens opportunities to grow. The more you practice, the more confident you become in handling edges that once seemed dull. This guide isn’t about perfection but about the process—about trusting yourself enough to take that first stroke. Every project gives me a reason to keep learning, and every blade I sharpen reminds me why I fell in love with the craft of DIY Tool Sharpening in the first place.
The Ultimate Guide to DIY Tool Sharpening
Sharpening as a Lifelong Art
For me, the art of tool care started with curiosity and grew into an essential habit that changed the way I work. Every stroke of sharpening is more than a task—it is a skill that keeps tools ready and reliable. Many DIY enthusiasts often begin this journey to save money, but soon realize the value goes far beyond cost. When blades hold their edge, they bring longevity and efficiency to every project. A comprehensive guide like this to DIY Tool Sharpening is meant to help you take control, to truly know your edges, and to enjoy the process as much as the result.
With patience and practice, I found that understanding the metal beneath my hands was the first step toward mastering its edge. Over time, I experimented with both simple strokes and advanced techniques, learning that even small changes in motion can transform performance. Each tool carries a story, and sharpening it brings back its life. For anyone serious about craft, this journey is less about speed and more about connection—a chance to respect the process and refine your own hands-on knowledge.
The Ultimate Guide to DIY Tool Sharpening
Understanding Your Tools in Depth
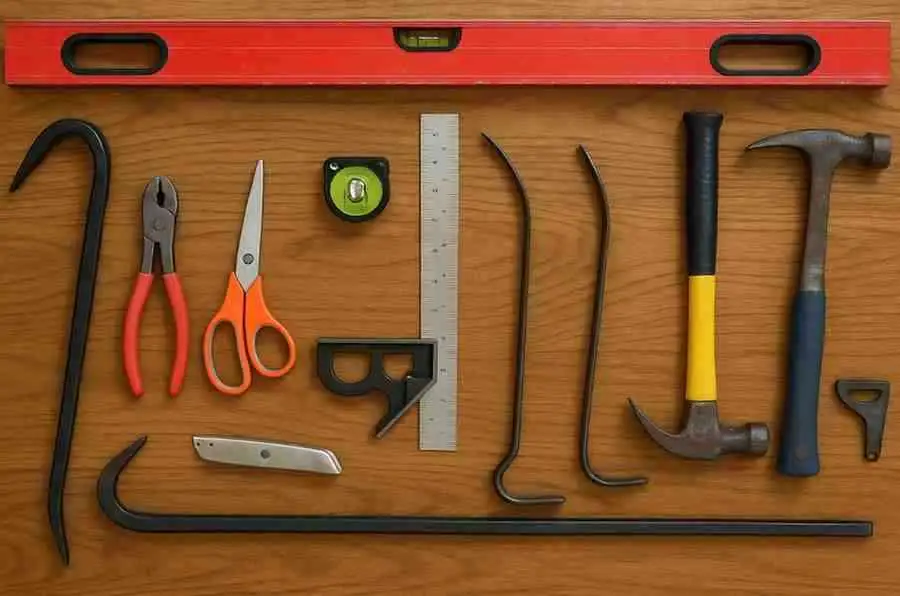
One of the first lessons I learned in woodworking was that different Types of Tools demand different sharpening techniques. They can be easily categorized into cutting tools like knives, chisels, or planes, and garden essentials such as shears, pruners, or even a lawnmower with dull blades. A thin edge like a knife requires a delicate touch, or else it may chip or crack. With a chisel, the bevel on one side must be kept at a steady angle and carefully maintained. A plane’s blade is often set with the bevel facing down, which calls for special consideration. Meanwhile, thicker blades like those on heavy garden tools may need a more aggressive approach to restore sharpness. I still remember using a Beginner’s Guide on Wood Carving Gouges that helped me see how each edge tells its own story. Understanding these differences is key when learning DIY Tool Sharpening.
Beyond that, knowing the Anatomy of your tool is just as important as the method. The parts—from the blade, bevel, and edge—are crucial in making sharpening truly effective. The sloping surface of the bevel leads toward the cutting point, and the role of the angle is key in determining how sharp the tool becomes. The tip is where the real action happens, a fine intersection between the face of the blade and its edge. Understanding these details transforms sharpening from a chore into a craft, giving you precision and confidence in every stroke. Mastering these aspects is essential in DIY Tool Sharpening.
The Ultimate Guide to DIY Tool Sharpening
Sharpening Basics You Must Know
Understanding Sharpness starts with two main factors—the thinness of the edge and the smoothness of the material. A sharper tool with a thinner, smoother edge cuts more efficiently, requiring less force to penetrate. Even microscopic imperfections can cause it to cut unevenly or get stuck, so keeping the surface consistent is key. When I began sharpening my own kitchen knives, woodworking chisels, and garden shears, I realized how fundamental this knowledge was to mastering DIY work. The process itself has two stages—grinding and honing—each with its own goal. While grinding focuses on shape and removing metal from chipped, dull, or incorrectly formed blades, honing is about refining the point and smoothing out scratches. Gaining proficiency in these steps is critical for effective DIY Tool Sharpening.
For grinding, I often use a coarse stone or power grinder with the right wheel, being careful to control heat that could change the temper of the steel. A step-by-step guide helped me learn how critical the angle is—it varies but the general rule is between 25° and 30°. Keeping a smooth, controlled manner ensures a uniform edge, and the burr on the opposite side is the sign you’re ready for honing. With honing, I use a finer stone in the 1000, 6000, or even 30,000 grit range. By keeping it wet with water or oil, the particles float away, preventing clogging. I learned to apply steady pressure, slide the blade across the full length, and alternate sides to achieve a symmetrical, shiny polish. Among the essential tools, a Whetstone—a rectangular block available in different grit sizes with lower numbers indicating coarser options—is my go-to, while a Diamond Plate, with metal-embedded grit, proves highly durable for shaping. For precision, a Honing device that holds the blade at the correct angle is invaluable, especially for beginners learning DIY Tool Sharpening.
The Whetstone Block
When I first started sharpening my own tools, I quickly realized that nothing beats a whetstone. It looks simple—just a rectangular block—but its ability to sharpen the edges of steel is unmatched. A good stone becomes more than just equipment; it becomes a reliable companion in every workshop session. I’ve used different sizes and noticed how the grit and numbers printed on them are not just labels but guides, indicating how fine or coarser the surface really is. For anyone beginning DIY Tool Sharpening, mastering the whetstone is an essential first step.
The choice between finer or rougher stones depends on what result you need. For a chipped chisel, I reach for a lower grit stone because it works faster. For finishing, I rely on a higher number stone that leaves a clean polished edge. This small understanding changed how I maintain my tools, saving me from replacing dull blades too often and teaching me how control, patience, and the right block can transform sharpening into an enjoyable skill. Practicing consistently is key for mastering DIY Tool Sharpening.
Diamond Plate Precision
Among all sharpening tools I’ve tried, metal plates embedded with diamond grit stand out for their strength and consistency. Unlike softer stones, they remain incredibly durable even after years of use. What impressed me most was how smoothly they handle both rough grinding and fine shaping, giving my blades a balance of speed and accuracy. Whether I’m restoring a chipped chisel or refining delicate edges, the plate delivers a steady performance without warping or wearing down. For anyone learning DIY Tool Sharpening, diamond plates are an excellent addition to the toolkit.
The first time I used a diamond plate, I realized how much easier it made maintaining each tool. With just a few passes, the blade felt sharper and cleaner compared to traditional methods. These plates also save time since their flat surface doesn’t require much upkeep. For anyone serious about DIY Tool Sharpening, relying on a strong, durable plate makes the difference between struggling with dull blades and enjoying precise, polished edges every time.
Honing Guide Support
When I first started learning sharpening, I often struggled to keep the tool steady at the correct angle. That’s when I discovered the device known as a honing guide, and it completely changed my approach. This small helper holds the blade firmly in place, letting you focus on smooth strokes instead of worrying about slipping or creating uneven edges. Using a honing guide is especially helpful for beginners learning DIY Tool Sharpening.
For beginners, especially, a honing guide removes the guesswork from sharpening. I still remember the difference it made the first time I used it on my chisels—suddenly, the edge came out cleaner and more consistent. Even now, after years of practice, I sometimes rely on it when precision matters most. It’s a simple yet effective tool that ensures every pass across the stone brings you closer to that sharp, polished finish. This is especially valuable for anyone starting with DIY Tool Sharpening.
Step-by-Step Tool Sharpening
When learning to sharpen different tools, I found that starting with a whetstone made the process easier to understand. A rectangular block with varying grit sizes gives flexibility—lower numbers often indicating coarser stones for shaping, while finer ones refine the edges of steel. For a knife, I always begin by soaking the stone in water, which helps reduce heat buildup and keeps metal particles from clogging its pores. Once ready, I hold the blade at the correct angle, usually between 15°–20° for kitchen knives, and then slide it across the stone. Applying moderate pressure, I make sure each stroke stays steady. I repeat the process on the other side until the blade feels truly sharp. Using a whetstone is a fundamental step for anyone practicing DIY Tool Sharpening.
For a chisel, a honing guide becomes invaluable. I set and adjust the guide so the tool protrudes at the proper angle, often around 25°. Just like with a knife, I wet the whetstone to manage heat and prevent clogging. Then I carefully slide the chisel across the stone, covering the entire length of the bevel. Afterward, a small burr usually forms on the back; I remove it by rubbing the chisel flat against the stone. This careful method ensures the cutting edge is balanced, smooth, and reliable for woodworking tasks. A honing guide is an essential tool for anyone learning DIY Tool Sharpening.
The Ultimate Guide to DIY Tool Sharpening
Advanced Techniques and Tips
One of the most overlooked steps in sharpening is Stropping, a finishing process that uses a leather strap to align the microscopic teeth along the edge of a blade, leaving it truly razor-sharp. From my own work in woodworking, I’ve seen how even a thin layer of compound on the surface of the strop can transform a dull tool. Simply hold it at the correct angle, gently pull the edge across the back, and repeat the motion several times. This little detail not only improves sharpness but extends the life of your blades. Stropping is an essential finishing technique in DIY Tool Sharpening.
Equally important is checking for a Burr—that tiny fold of metal that forms on the blade during sharpening. Feeling for it is a good way to know if the edge is sharp enough. But none of this matters without Safety Measures. Always wear gloves and eye protection when you sharpen. Cut-resistant hand gear and guarding against accidental slips are critical. Small metal filings can fly, so protecting your eyes is just as important. And always Sharpen Away from Your Body—a simple adjustment that reduces the chance of injury. For further practice, check any Related Article that helps you Clean and Maintain your DIY Tools, because keeping them in top shape goes hand in hand with mastering DIY Tool Sharpening.
The Ultimate Guide to DIY Tool Sharpening
Conclusion
For me, mastering the art of tool sharpening has always felt like a rewarding journey. It takes patience, regular practice, and plenty of persistence to truly learn how to keep your tools sharp and efficient. Even a seasoned craftsman will tell you that knowing how to properly sharpen is an invaluable skill, while a weekend DIYer can experience the same joy when their blade slices smoothly instead of dragging. Developing proficiency in DIY Tool Sharpening makes every project easier, safer, and more enjoyable.
I’ve found that you should never underestimate the satisfaction that comes from working with a well-sharpened edge. Whether it’s a chisel restoring fine details in wood or a knife gliding through ingredients, the results prove the effort is worth it. Sharpening isn’t just about maintenance—it’s about building a connection with your craft, giving every cut more precision and confidence. Experiencing these results is one of the most rewarding aspects of DIY Tool Sharpening.


Leave a Reply