
Brewing Nature’s Spirit
In this blog, I share the journey of brewing a wild mead from scratch — the kind that truly carries the taste of nature. My focus wasn’t just on the video I shared on YouTube, but on the finer details that every traditional brewer would appreciate. The process requires patience and creativity — from sourcing local honey and yeast to learning how each batch behaves differently. I still remember the first time I tried ingredients from my own region; the aroma of the finished wild mead was unlike anything else, a reward that only nature could give.
If you’re thinking of giving it a try, I’d suggest you watch the latest video where I’ve embedded the full process and shared insights that are hard to explain in a single post. Once you come back, you’ll find this post contains everything you need to replicate the experience yourself — step by step. You can also find the link to the tutorial below, making it easier to follow along without missing any hidden gems I’ve discussed. Every time I brew another wild mead, it feels more personal — a reflection of my growing respect for simple, natural craftsmanship.
Nature’s Hidden Brewer – Yeast From Bees
Many people are often surprised to learn that bees, like many other insects, actually contain a large number of yeast living inside their guts. As a wild brewer, I’ve always appreciated how simple yet fascinating the bee microbiome is — it’s perfectly divided into two major groups, yeast and bacteria. Within it, you can find brewers’ favorites like Saccharomyces cerevisiae and its closely related cousins, including Saccharomyces paradoxus. But what truly caught my attention were the species from the Lachancea genus, an unusual family of yeasts that can ferment sugars like glucose and maltose into lactic acid. This process single-handedly produces sour beers, ciders, and wild meads, all crafted with nature’s own microbes.
The other half of this story lies in the bacterial world — bacteria such as Acetobacter and Lactobacilli, which I’ve often found in traditional fermentations. In the presence of oxygen, Acetobacter can transform alcohol into acetic acid, the same process that gives vinegar, kombucha, and other beverages their characteristic punch. These kinds of microbial friends are not only fascinating but deeply connected to centuries of natural brewing. It’s interesting how something so small, once isolated, becomes the key to flavors that no lab yeast could ever replicate — a long-appreciated secret of wild mead and other naturally fermented drinks.
The Challenge of Brewing Wild Mead from Bees
At first glance, it might seem easy to make wild mead or even beer, cider, or wine by simply using yeast and bacteria from bees. You could just mush up a bee or two and toss them into the must—but here’s where the problem begins. The diet of bees is simple, made mostly of honey and pollen, and while the yeasts inside them can eat sugars like glucose, fructose, and sucrose, they often can’t handle the more complex ones found in wort. I once found that even though this natural approach felt friendly to the environment, it evolved into a learning experience that taught me just how tricky balance can be in wild brewing.
The second issue is hidden inside the intestinal tract of the bee—there isn’t much alcohol there, which means the yeasts living inside have low tolerance for concentrations above 1% or 2% ABV. In practice, this means they cannot ferment efficiently and end up killing themselves off before completing their job. The cause lies in the natural mix of microbes that simply weren’t evolved for brewing beyond a small amount of sugar fermentation. I’ve learned that finding the appropriate mix of wild cultures and adjusting the honey or sugar levels in the must is crucial—otherwise, your wild mead might stop kicking before it ever truly begins.
Finding the Good Yeast
When making wild mead, one of the biggest issues I’ve found is that not all yeasts behave the same way once they begin to ferment. Before trying anything on a large scale, it’s clearly necessary to proof your yeast and see how it reacts under different conditions. In my video (around timestamp 1:50 to 3:20), I show the setup I use to test this, but it’s worth discussing in more detail. The environment you create should mimic the extremes of a real fermentation—from alcohol tolerance to nutritional limits. I’ve found that testing ahead of time not only saves effort but also improves the quality of the wild mead you plan on fermenting.
Over the years, I’ve learned the simplest approach is to divide the process into separate steps rather than doing everything at once. The first stage focuses on selecting for alcohol tolerance, while the second ensures nutritional comparability. This method gives a better success rate and produces yeasts that thrive under real brewing conditions. From my experience, these steps make it easier to adapt to any recipe—whether you’re experimenting with new wild mead strains or refining traditional ones. Every experiment teaches something new, and once you’ve outlined your method properly, you’ll always have a reliable framework that works.
Selecting for Alcohol Tolerance
When creating wild meads, one of the most crucial steps is selecting the right yeast that can handle alcohol at high concentrations. In my video, I showed how I prepared a standard beer starter of about 250 ml (1 cup), adjusting the gravity to 1.045 using 35 g of dry malt extract and water, then boiling it to sanitize. I usually aim for around 10% ABV, which is typical for meads, though this can be adjusted lower for beers or ciders, or higher for stronger wines. I always recommend using a value around 1% to 2% above what you plan on brewing, as it ensures your yeast can truly handle the desired final concentration. Once fermented, the yeast should show normal attenuation, and if it can survive that stress, it’s ready for making robust wild meads.
To boost the final alcohol content, I often add an unflavored spirit like vodka, white rum, or tequila in the 40–50% ABV range. I calculate the approximate volume of alcohol using a simple formula, and after boiling and cooling, the mixture is poured into the wort before I toss in the abdomens of bees, wasps, or fruit flies that feed on fruits and flowers. As they ferment, I monitor gravity readings over days to check success—a thick layer of yeast means a strong, successful culture, while minimal growth after 7 days means failure and time to try again. In optional nutrition tests, I use DME-based starters in lower-nutrient environments like cider, wine, or wild mead, blending table sugar and corn sugar to help each strain grow, perform well, and stay rich enough for wild brewing.
Staged Nutrient Addition and Degassing
When working with wild mead fermentation, I’ve learned that precision and patience can make or break the brew. My approach is a modified TONSA method, inspired by an old invention in mead-making history. This method, built around staged yeast nutrient additions, allows for rapid production—what once took more than 12 months with traditional methods can now be prepared beautifully in just 6 weeks. In my recipe, I worked with a smaller volume, so I had to perform the steps a bit differently. Without enough frequent gravity readings, I condensed the three nutrient feedings into two: the first yeast pitch, and a second (and third) combined 48-hour point addition. This change didn’t affect the fermentation—instead, it made the process more flexible for test recipes. The balance of yeast, nutrient, and time keeps the wild mead alive and complete.
Another key element is degassing, especially in brewing high-gravity beers, wine, cider, or wild mead. It helps improve performance and keeps yeast from becoming stressed under alcohol tolerance limits. When dissolved CO₂ starts to acidify the ferment, it can limit fermentation enzymes and slow their rate of activity. Regularly degassing during the primary stages helps reduce stress, avoid off-flavors, and speed up finishing. I recommend doing this daily for the first two or three days, which are most critical. In mini fermenters, I degas by replacing the airlock with a cap, shaking gently, and loosening it to burp the CO₂ before resealing. For larger ferments, I use a wine whip on my drill—after sanitizing, I immerse it to the bottom of the fermenter and pulse at maximum speed (3–5 seconds). I avoid stirring to a whirlpool, which can introduce oxygen. Pulsing continues until no more gas release is visible. Go slow, though—a vigorously long neck of a carboy can act like a rocket nozzle, causing a foamy, yeast-filled mess across the ceiling, head, and tools—a mistake I learned the hard way!
Bottling and Carbonation
When it comes to packaging your wild mead, one of the most important choices is whether it will be served still or carbonated. The experience is truly amazing—a carbonated mead often feels lighter, with a more pronounced aroma and flavor, while a still mead is softer, letting complex flavors shine. In my experience, I almost always split batches of wild mead, bottling a third as carbonated and leaving the remainder still, which allows me to enjoy two different experiences from the same recipe.
Packaging doesn’t have to be complex. I transfer the wild mead to bottles and dose honey to carbonate them appropriately. Using carbonation calculators, I add about 3 ml of honey per standard beer bottle (350 ml/12 oz) to reach roughly 3.5 volumes of carbonation, which is safe for standard beer bottles and on-style for many meads. Unlike wild beers, this mead can be bottled quickly after fermentation is complete because honey, comprised mostly of simple sugars, leaves nothing for wild yeast or other microbes to consume. Proper dosing of carbonation ensures you avoid bottle bombs and keep your fermentation complete, resulting in a safe, flavorful beverage every time.
Wrapping Up the Wild Brew
Making wild mead is an easy entry point into wild fermentations, especially for those curious about natural yeasts and simple sugars. The mead must is fermented by a broader range of yeasts compared to the complex sugars in beer wort, which makes the process both approachable and rewarding. Using the TONSA method, it’s possible to produce drinkable wild mead in just a month, allowing you to enjoy the products of your wild endeavours earlier than traditional wild beers, ciders, or wine.
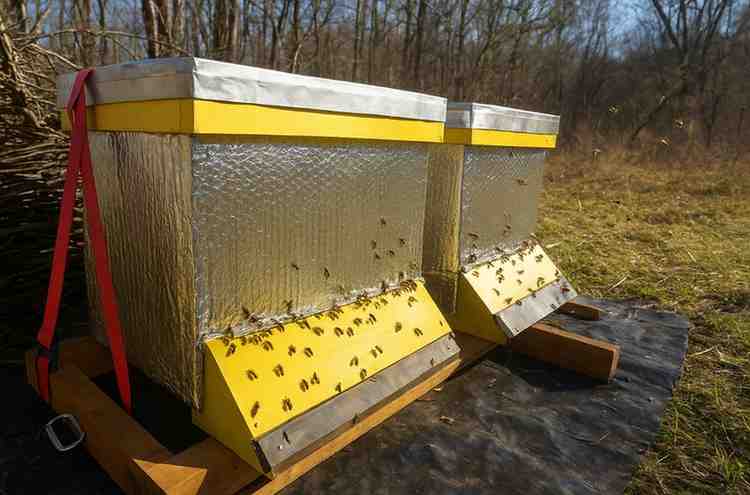
On top of that, keeping bees adds an extra bonus—it’s a fun, easy hobby that can also earn a bit of money. The combination of crafting wild mead and caring for bees makes the journey hands-on, educational, and genuinely satisfying. With some patience and attention, anyone can explore wild fermentations, taste the results, and experience the charm of homemade wild mead while enjoying a small, rewarding side benefit from beekeeping.


Leave a Reply